Showing posts with label Software Trick. Show all posts

Wednesday, 13 November 2013

Everyone knows that Microsoft has officially released their new product worldwide. Most of the Windows fans have upgraded their PC to new operating system. If you have not still Upgrade your PC to Windows 8 OS.

Windows 8 has been released with its new features and facilities. one of its feature in this is Windows 8 start-up screen or Windows 8 start menu style. Most of the Windows 8 users don't like this start menu style, because Windows 8 start button is looking good and smart but not very easy to use it. So its not user-friendly when we compare with Windows 7 start menu. 


How to Get Back Windows 7 Start Menu to Windows 8


But there is an option available to customize Windows 8 start menu to Windows 7 start menu style. This will make your stuffs more easy in Windows 8. Users can customize Windows 8 start menu to Windows 7 start menu style by using Stardock Start8. This tool helps you to bring back Windows 7 start menu on Windows 8 OS. 

Click Here to Download Start8

After the installation completes, you can see start button in Windows 8, its similar to Windows 7 Start button. So now you can easily access to shut down, devices, music, videos, and documents with one click.

How to Get Back Windows 7 Start Menu in Windows 8

Sunday, 10 November 2013

Some Time You have might be getting that 40 days trial period popup if you haven't purchased the WinRAR tool full version for your computer, well now the free version actually works as a full PRO version and there is not big need to grab the full version tool as free version only comes up with a 40 days trial period popup which now an be removed easily using a free tool and a simple guide.

So now we will be using the Resource Hacker that allows us to modify and edit software controls pretty easily. So we will be searching for the reminder dialog control set and then we will be deleting that control set in order to remove the notification.

Now if you wanna check full text tutorial then its written below so just follow all the steps mentioned below and enjoy.   


  1. Download Resource Hacker tool.
  2. Now after downloading this tool, install it onto your system.
  3. Now you need to fire it up and give your WinRAR.exe path to it.
  4. So press File > Open and navigate to C: > Program Files > WinRAR and choose WinRAR.exe by double clicking. 
  5. So now you have selected your file it will show some folders on the left hand side so now expand Dialog > Reminder and you will see some 4 digit file.
  6. Click on that file and then it will show you the exact 40 days trial notification popup that you normally see,
  7. So now right click on that 4 digit file and choose Delete Resource option.
  8. Now you have deleted your resource choose File > Save as option and save that new file onto your desktop with WinRAR as your file name.
  9. Now your new file is created, now we need to replace this new file with your old file in C: > Program Files > WinRAR.
  10. Now just replace the file and press Continue, that's it now your new file will be up and running and you can verify it by double clicking on that file.
So now you won't get any trial days expire notification popup when you use WinRAR, so now you can enjoy free version WinRAR as full version tool. So guys do like this post below if you really got some knowledge from this post, have fun & enjoy.

How to Stop WinRAR 40 Days Trial Period Popup Permanent

Sunday, 15 September 2013

uTorrent

There is a cool hidden trick in uTorrent that nobody knows about.
Here is how you should go about it:


1]- Open uTorrent.


Open UTorrent


 2]- Navigate to Help> About uTorrent.


Navigate to Help> About uTorrent

3]- When it shows the version screen, PRESS THE ‘T’ key on your keyboard and 


play Tetris game

you should be able to play Tetris game then and there.

Hidden uTorrent Tricks

Tuesday, 20 August 2013

For those of you who want to root your Nexus 4 Android smartphone, here’s a step-by-step tutorial showing you how to root a Nexus 4 on Windows, Linux/Ubuntu, or Mac OSX computer.


This works for all Android versions including Android 4.2.1 and 4.2.2.

This rooting guide will allow you to also backup and restore your apps/settings.

Before we begin, please BACK UP EVERYTHING on your internal storage of Nexus 4 to your hard disk (you can do this by connecting it to your computer via USB cable or use AirDroid app).

This zip package contains everything you need including drivers for Windows and rooting files for all Windows, Mac, and Linux.  Please download and unzip.


Step 1. 

Go to Settings->About Phone on your Nexus 4.


Step 2.

Hit the “Build Number” couple times until your phone says, “You are now a developer”.  Hit the back button. 


Step 3.

You will now see extra menu called “Developer options”, hit it.


Step 4.

Make sure Developer options is ON and USB debugging is also checked then connect a micro-USB cable from your Nexus 4 to your computer.  


Step 5.

For Windows, you will need to install drivers. If you have Linux/Ubuntu or Mac OSX, skip to Step 7.


Step 6.

Open Device Manager on your computer and update the Nexus 4 with exclamation mark with drivers provided in Nexus4Root.zip.


If you see something like “Android ADB Interface” you are ready for the next step.


Step 7.

Open a command prompt (or terminal for Linux/Ubuntu or Mac) and type:


For Windows: 
cd Downloads 
cd Nexus4Root 
adb backup -apk -all -f backup.ab
  
For Linux/Ubuntu:
sudo -i
cd /home/UserName/Downloads/Nexus4Root
chmod 755 *
./adb-linux backup -apk -all -f backup.ab
  
For Mac OSX:
cd Downloads
cd Nexus4Root
chmod 755 *
./adb-mac backup -apk -all -f backup.ab 


Step 8.

Go to your phone and you should see a Pop-up window asking you if you want to backup your data, hit “Back up my data”.  This will backup all of your settings, apps, app data, wifi passwords, etc…etc…  It will NOT BACKUP contents of your internal storage such as your personal videos/photos (you should have done that before following this guide!!!).


Step 9.

Once backup is done, go ahead and turn your Nexus 4 power off.  Then hold down the Volume Down and Power buttons together for about 5 seconds.  


Step 10.

Once in bootloader menu, connect a micro-USB cable from your Nexus 4 to your computer.


Step 11.

Open up Device Manager again, if you don’t see “Android ADB Interface” you will have to install drivers again.  Repeat Step 5 to install drivers.  For Ubuntu/Linux or Mac OSX, skip to Step 12, no drivers required!


Step 12.

Next go back to command prompt/terminal and type:


For Windows: 
adb oem unlock
  
For Linux/Ubuntu: 
./adb-linux oem unlock
  
For Mac OSX: 
./adb-mac oem unlock 


Step 13.

Go to your Nexus 4, hit the Volume Up button to select “Yes” and hit the Power button.  Then hit the Power button again to re-boot your phone


Step 14.

Once re-booted, your Nexus 4 will be like the day you got it, everything wiped and starting from scratch. Go ahead and sign in.  


Step 15.

Connect your Nexus 4 to your computer and copy the file CWM-SuperSU-v0.99.zip to anywhere on your Nexus 4.


If you have trouble on Mac OSX connecting to your Nexus 4, download and install Android File Transfer. 
Also, if you have more trouble, you can download this file with your Nexus 4′s browser at DownloadAndroidROM.com. (It will be saved in your Downloads folder btw.)


Step 16.

Re-boot into the bootloader like you did in Step 9 and connect a micro-USB cable from your Nexus 4 to your computer.  


Step 17.

Go back to your command prompt/terminal and type:


For Windows: 
fastboot flash recovery recovery-clockwork-touch-6.0.2.3-mako.img
  
For Linux/Ubuntu: 
./fastboot-linux flash recovery recovery-clockwork-touch-6.0.2.3-mako.img
  
For Mac/OSX: 
./fastboot-mac flash recovery recovery-clockwork-touch-6.0.2.3-mako.img


Step 18.

Go back to your Nexus 4, choose “Recovery mode” using Volume buttons and hit the Power button.  


Step 19.

Once in ClockworkMod(CWM) Recovery, choose “install zip from sdcard”.


Step 20.

Next, choose “choose zip from sdcard”.  


Step 21.

Choose “0/”.


Step 22.

Choose “CWM-SuperSU-v0.99.zip” and hit “Yes”.  This is the actual rooting file, which included su binaries and SuperSU app, giving your phone root.  This is the only part of this tutorial that actually roots your Nexus 4.  We only did all the other steps to unlock the bootloader and install CWM Recovery which allows us to install this file on our phone.  


Step 23.

Choose “Reboot” from the main menu, if you see the following screen, make sure to choose “Yes – Disable recovery flash”.  This is so you will have permanent CWM recovery as stock Android operating system overwrites it on re-boot if you don’t say yes here.


Step 24.

Once rebooted you should find an extra app in the app drawer called “SuperSU”.  Congratulations!  You’ve successfully rooted your Nexus 4!  You can download rooted apps like Titanium Backup app (which I highly recommend you to run once) and verify you have full root.  


Step 25.

Now, let’s try to restore some of your settings, apps, and app data.  If you did make a backup of your internal storage before you started rooting, go ahead and copy all your files back into Nexus 4 internal storage.


Next, go back to command prompt/terminal and type:

For Windows: 
adb restore backup.ab
  
For Linux/Ubuntu: 
./adb-linux restore backup.ab
  
For Mac OSX: 
./adb-mac restore backup.ab 

Once that’s done, you should find your Nexus 4 fully restore with all of your settings, apps, app data, and your photos/videos plus rooted phone. 
Congrats! 

How to Root Nexus 4 [Any OS]

Saturday, 17 August 2013


Do have files that you consider confidential? or a files that you don't want to see by your wife or kids? then hide it behind the JPEG image. Here is a clever and simple trick to hide your files behind Jpeg images. 

Here is what you need:
  • WinRAR installer
  • Image or Picture files 
  • and the Files that you want to hide.
1.Dpwnload and install Winrar
2. Next create a Folder then put any IMAGE file and the FILES that you want to hide inside.
3. Compress the files that you want to hide by selecting the files then right click then select "Add to [Foldename]"


4. Now you will see that a new compress file is created
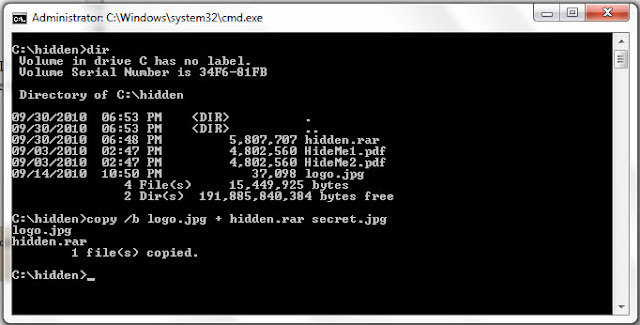
5. Now here is the trick: Enter toCMD and navigate to where you put your files (in my case I created a folder in the root of drive C: ),  if you are using Windows7 just hit SHIFT + Right Click the mouse anywhere inside the folder then select "open command window here". Then type in command prompt:

 copy  /b  logo.jpg  + hidden.rar  secret.jpg

Where: logo.jpg is an image | hidden.rar is compressed file to be hidden | secret.jpg is new image files with hidden file. 

6.  You will notice a secret.jpg file is created. Now you have a jpg image file with your files inside it. Now who will think that your files is hidden inside a jpg image. :)

To access the hidden files: just rename or change the extension file .jpg to .rar and you can view or extract your hidden files

Hide your Files Behind JPEG Image

Monday, 1 July 2013

Top 5 sites to find your serial keys

Saturday, 29 June 2013

Hello Friends,
VLC player probably is one of the most feature rich media player used. Back then (before I knew vlc can convert) I used to waste a lot of time trying to download different kind of video converters that didn’t even get my job done properly, until recently I came to know that i already have the best free video converter possible. To convert a video or mp3, 3gp, AVI, FLV and more is very simple and today we go know how.


These are the simple steps to take if you want to convert your audio/ video using VLC player

FOR WINDOWS SYSTEM


1. Click Media at the top left corner, and then go to “Convert/Save…”

2. Select the file you want to convert using “Add” button. Now click on “Convert/Save” button and next window will appear.

3. Now click on browse, select where you want to save the converted file to and put the filename.

4. For the destination file you will see the location of the path where you want to convertthe file to

Change the last extension from .ps to whatever you want to save it as (screen shot below)


FOR MAC SYSTEM


1. Click File Streaming/Exporting Wizard and check Transcode/save to a file and hit Next.

2. Click choose and select the file you want to convert and hit Next again. Check Transcode video and audio boxes and select the output formats for you video, after hit Next twice.

3. Select the location where you want to save the output using Choose button, hit “Next” and later Finish.


Use VLC Media Player As A Video Converter

Monday, 24 June 2013

The world are now addicted 3-D movies. Every week, a new 3-D movie has been releasing and there is need to be surprised about it as the trend for 3-D films is rapidly increasing.
Here i would like to tell you a simple trick to watch 3-D blu ray Half SBS films in ur pc using VLC Media Player.


1-Open VLC Media Player
2-Click Tools
3-Select Effects and Filters
4-Choose Video Effects
5-Then Vout/Overlay
6-Now u can see a box for 'Wall'
7-Click on that box and arrange rows-3 and columns-2
8-Now vlc will appear in a multiple window
9-Choose any one of that window and watch it in full screen and get the 3-D effect..
Enjoy!!!!!!!!!!!!!


Watch 3D movie on vlc

 
Computer World With IT © 2015 - Designed by Templateism.com