Showing posts sorted by relevance for query software. Sort by date Show all posts

Saturday, 9 November 2013

Today I'm gonna talk about Password Protection to Pan Drive without using Software.

I will show you a simple trick to lock your USB drive without using any 3rd party software.
Most of the people doesn't like other people checking their personal files and folder on USB, including me. This insecure situation creates a huge space to theft our personal data by someone. If you use password protection to your USB, you can reduce the data theft.

Lots of USB password protect software available in present market, but you want to pay money to use it for lifetime. If you're using Windows you don't need any software.


Password Protection to USB Drive without using Software
So let's see how to set a password protect on your Pan Drive without using any software.

Insert your Pan drive to computer
Click on Start
In "Search programs and files" box, type Bit locker Drive Encryption
Now launch that application.
Password Protection to USB Drive without using Software

Then look for your Pan drive and click on Turn on Bitlocker
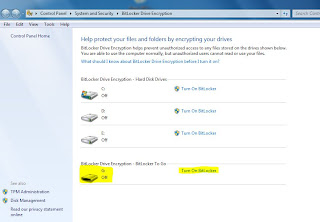
Password Protection to USB Drive without using Software

Windows will ask you to set a password. 
Now set a strong password.
Click on Next
Password Protection to USB Drive without using Software

If you want save the password in a safe place.
And click on Next
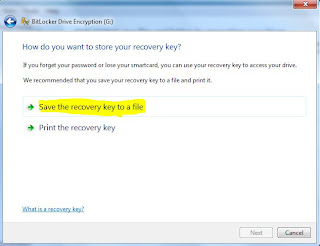
Password Protection to USB Drive without using Software

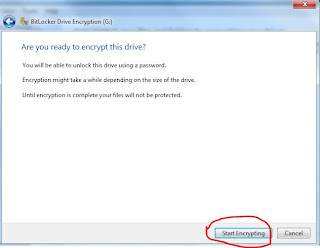
Now click on Star Encrypting
Password Protection to USB Drive without using Software

That's all !!! :)
From right now if someone tries to access your USB, Windows will ask him/her to enter the current password.

Note : This trick will works only in Windows

How to Password Protection to Pan Drive without using Software

Friday, 26 October 2012

Internet takes a prominent place in today’s fast moving world. there are people who are completely addicted to it, but the problem that we all face today in using internet is Speed. internet itself got lots of software to improve its speed, but how many of those actually work perfectly? your reply would be simply "NO"


How would you feel if I tell you a way to increase the speed of your internet connection without any software or expenses? There is a simple windows trick available to do this task easily.
Already I have given you a trick to Speed Up Internet 20% - 30% Without Any Software. Don't miss to read it.

How to Speedup Internet Without Any Software?

Right Click on My Computer

Click on Properties

Then click on Device Manager


How to Speed Up Internet Connection Without Any Software


Now Device Manager window will appear

In this, Double Click on PORTS (COM & LPT)


How to Speed Up Internet Connection Without Any Software  


Then, Double Click on Comunications Port


How to Speed Up Internet Connection Without Any Software


Now select Port Settings tab


How to Speed Up Internet Connection Without Any Software


Change Bits per second value to 128,000
And change the flow control to hardware


How to Speed Up Internet Connection Without Any Software

Now Click on OK

That's all, you have done !!! And when you browse the internet again, definitely you will feel the difference in speed.

Speed Up Internet Connection without softwareSpeed Up Internet Connection without software

Sunday, 27 January 2013


Google Pack is a software package that allows users to discover, install, and maintain a number of application programs. It was announced at the 2006 Consumer Electronics Show, on January 6. Google Pack is currently only available for Windows XP, Windows Vista, and Windows 7.


Google Pack Free Collection OF Software

Thursday, 24 January 2013

The Most peoples are using trial softwares.but they can use it small period.Is software getting expired soon, there is no other option other than buying it.
But if you want to save you'r money, you can extend the trial period of software and use the trial period as much as you want.


How To Extend Trial Period of Demo Version Software

Sunday, 10 November 2013


Today Computer World With IT tutorial is about how to hide your local drive without any 3rd party software's . There are lots of free and payable software's available to hide your local drive, but I am not gonna talk about hide a local drive using a software. In this tutorial I will show you an easiest way to hide local drive without using software. This will save your both money and time.

There are 3 methods available to hide a local drive without using any software

1. Hide a drive through gpedit
2. Hide a drive through regedit
3. Hide a drive using command prompt


Today we are covering 3rd Method command prompt way of doing it. So lets see how to do.

How to Hide any Local Drive using CMD

How to Hide a Local Drive using command prompt?


1. Click on Start - Run

2. In Run box type cmd and hit Enter. Now Command Prompt window will appear.

3. In command prompt, type diskpart and hit Enter.

4. Then type list volume and hit Enter.

Now it will display the list of all your computer drives details.

How to Hide any Local Drive using CMD

5. Then type the Drive Letter which you want to hide.
If you want to hide volume E, type select volume E and hit Enter.

Now follow mentioned massage will appear to you.
Volume 4 is the selected volume


How to Hide any Local Drive using CMD


6. After that, type remove letter E and hit an Enter. 

That's all, you have done. Now restart your computer once. When you start your PC again, you want be able to see the particular drive in My Computer.


How to get back Hidden Drive again in My Computer.


Do the procedure which i have mentioned in step 1,2,3,4 and 5 again.

Click Start----> Run 
----> cmd ----> 

Then type diskpart - list volume - select volume E 

After that type assign letter E and hit Enter.

That's all !! You have got back the hidden local drive. Once again restart your PC, now you will be able to see hidden local drive in My Computer.

Note: Your PC doesn't lost any data by doing this trick .

How to Hide any Local Drive using CMD

Thursday, 27 June 2013

We all use YouTube to view latest videos. However , YouTube does not allow us to copy or download any type of videos from here. There are many software’s which allow us to download videos from YouTube but the worst part is that most of them are paid and we often see various types of errors while downloading videos using these. 
So today i will tell you the most easiest way of downloading videos from YouTube without using any software.

How To Download Videos From Youtube Without Using Any Software

Let us start now ,
1. First of all open any YouTube video. Let us say that we want to download this video i.e  “How to change template in Blogger”.
Open Video Target Page in Youtube
 
2. Now Click on the address bar and carefully replace “youtube” with “voobys“.
 
Before
Original Youtube Video URL
After
Replace YouTube with Voobys
 
3. Hit Enter and you will be redirected to a new page.
 
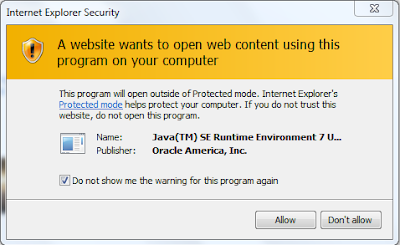
4. As Voobys use Java to run YouTube videos , so allow the Java to run on this site and use “Always Run on this Site”Or “Dont show me warning again for this site” for easy access to this site in future. 
 
Allow Java to Run on this Site
 
5. Now we will see that all the versions of different formats and quality of video are available for download.
 
Youtube Video Quality
 
Original Video Quality Versions
 
Voobys Video Qualities available for download
  
6. Click on the format and video you want to download and your download would start automatically.
 
Note – Don’t click on the links that i have crossed in the image as they are ads and are not for downloading videos instead they are links for other software’s or unwanted products.
 
Enjoy!! :)

How To Download Videos From Youtube Without Using Any Software

Monday, 11 November 2013

In this post I am gonna discuss an easiest Data Recovery Methods.
Today I will show you a trick to recover your deleted files without using any 3rd party software. I am not talking about restoring files from recycle bin.
Sometimes we might have delete some important files accidentally and we need them back. 
This simple trick mostly works on Vista versions and all the Windows 7  and Windows 8 versions.

How to Recover Deleted Files without Any Software


So let's see How to Recover Deleted Files without Any Software 

For example lets assume that you have permanently deleted "My Sweet Heart.JPG" from the folder named "My LIFE" ;) , and now you want to recover "My Sweet Heart.JPG"back.
Do this simple trick to recover your Sweet Heart.JPG
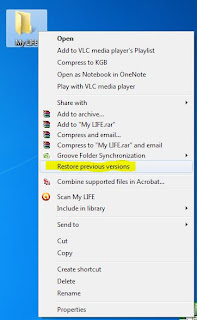
Right Click on the particular folder
Select "Restore previous versions"
Data Recovery Methods
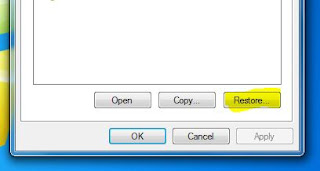
That's all, now you will see a option to recover the particular file.

Data Recovery Methods

If you don't see "Restore previous Versions" by Right Clicking, Go to
Control Panel ----->
System and Security---->
System---->
Click on System Protection (in left sidebar)
---->
Select the particular drive and Click Configure
---->
Then select "Restore system setting and previous versions of files"
---->
Now Click on OK

Note : 
Previous versions come from restore points or from windows backup.
This trick will not work at all the time.

How to Recover Deleted Files without Any Software

Sunday, 25 November 2012

Now days technology is changing very rapidly and every day something new discovered. Now Login to windows 7 through Face Recognition using a web-cam is one of the enhancements; a lot of us experimenting. Not only this save our typing but also is a more secure way if very much conscious about the security issue.

If you are also using Windows 7 and do have a webcam attached to the pc then you can test this a very little and tiny application called Blink; which may enable you to  log in to windows just by looking into the webcam only for just a second and your account wil be logged? How this is made possible because of the free software BLINK by Luxand which employs the advanced face recognition technologies to provide automatic, quick and reliable log in to one or many computer users.


Windows 8 is expected to have an Android like pattern logon screen where users can set a password based on user patterns. That can turn worth while on touch screen devices and get rid of the boring text passwords. That being said Windows 7 users don’t have anything cool to boast about at least when at logon screen. Neither do we have pattern logon or facial recognition screen in stock OS. While pattern logon may hit Windows 7 in the form of third-party app soon (Developers! Developers!) here is a free facial recognition software add-on.

This tool can be used as a free alternative to the commercially available “Fast Access” face recognition software that comes installed on many Dell laptops. Unlike Blink!, Fast Access being a premium product is feature rich.


Free Face Recognition Software for Automatic Log in to Windows 7

Sunday, 11 November 2012

Every PC should have a Antivirus protection, if not viruses and malwares can attack PCs very easily. We are using many free and paid antivirus software to protect our PCs against harmful viruses. Today I'm gonna give you a pack of antivirus programs. Facebook security offers you more than 10 free anti viruses software for its users. If you have a facebook account you also can get this offer. 


Facebook Offers More Than 10 Free Antivirus


Facebook security offers the following anti virus software for free.

1. Norton™ AntiVirus 
2. Avast! Free Antivirus

3. AVG Anti Virus FREE 2013 
4. Avira Free
5. McAfee Internet Security 
6. Kaspersky PURE Total Security 
7. Microsoft Security Essentials 
8. Panda Internet Security 2013
9. Trend Micro™ Titanium™ Internet Security 2013 for Windows 
10. Webroot SecureAnywhere Antivirus 2013
11. Total Defense Free Anti-Virus plus Free Cloud Based Security Assessment


How to get a free anti virus from facebook?

To get these anti virus for free, you have to like the particular product's official facebook fan page. When you click Like on the page, it will show you a download button.

Now choose any of the Antivirus.

Facebook Offers More Than 10 Free Antivirus

Now Like the particular product's official fan page.

Facebook Offers More Than 10 Free Antivirus


Now it will show you the option to download.

Facebook Offers More Than 10 Free Antivirus Software

Tuesday, 26 March 2013

Hi guys, today let me show you something really important in browsing internet.

Internet takes a prominent place in today’s fast moving world. There is no place without internet connection, but the problem that we all face today in using internet is SPEED. There are numerous software in internet itself to increase the speed of it, but how many of those really works?


How would you feel if I tell you a way to increase the speed without any software or expenses? There is a simple windows trick, I tried it and felt the difference, it made my internet connection 20% - 30% speedy, and then only I got the idea to share it with you all.


Speed up Internet 20% - 30% without any Software

Let's see how to do :

Go to Start – Run or Click Windows key +R


Now type gpedit.msc


Click OK.

Now Local Group Policy will appear.


Next navigate to "Administrative Templates" ---> 
"Network" --->
"QoS Packet Scheduler"


In "QoS Packet Scheduler" double click on "Limit reservable bandwitdh". 

"Limit reservable bandwitdh" box will appear.

In "Limit reservable bandwitdh" make it "Enabled" 
Then set "Bandwidth limit: "0". 
Click OK.


Now you have completed and when you browse the internet, definitely you will feel the difference. If this article is useful, put your comments and also share it with your friends through social networks.
Meet you in the next article :)

Speed up Internet 20% - 30% without any Software

Tuesday, 8 October 2013

operating System Online


http://susestudio.com/


Use SUSE Studio to Build a Linux OS From Scratch

Think you can make a better fast-booting, Chrome-focused OS than Google? Want to craft a custom Linux system that boots from a USB stick? SUSE Studio gives you 15 GB to do exactly that, and you do it all online.

SUSE Studio is what powered the fan-made “Chrome OS” we posted yesterday, which, in that case, was a semi-stripped-down system loaded with the developers’ version of Chrome, Google webapp links, and OpenOffice. If speed and cloud computing aren't your bag, you can create a fully functional system with Firefox, 3D graphics, and whatever apps you can find installed. Want your system to start up with an AWN dock and Launchy keystroke launcher running? Not a problem.

Even if you don’t know all that much about Linux, it’s pretty easy to build a system you can boot from a USB stick or live CD/DVD, run inside a virtual machine program, or actually install it—or, heck, even test it out in your web browser.

Here’s a basic walkthrough of building a system with SUSE Studio. In this case, we’re looking to build a GNOME-based system that would boot fairly quick and use Chrome for most of its functions, and use GNOME-Do as the primary application launcher.

Get an account, choose your desktop

First things first, you’ll need to grab an invitation and account from SUSE Studio. While it’s invite-only at the moment, I received my invite only 10 minutes after registering and filling out a quick survey that suggested it would boost my invite reply time. Once your invite arrives, you can sign into SUSE Studio with your Google or Yahoo account, or any OpenID provider. Not sure how to nab an OpenID? Here’s a quick video tutorial.

Once you’re signed in, head to your “Home” screen and click the “Create new appliance” link in the upper-right. SUSE Studio calls each bootable system you create an “appliance” throughout the process. You’ll be asked to choose your “base template,” which includes the GNOME and KDE desktops, a Just Enough OS (jeOS) option, and server or command-line-only choices. Most folks will want to lean toward GNOME or KDE setups, as they’re the most familiar graphical environments. If you’re familiar with Linux enough to know how to build a login manager and desktop from a command line system, though, go ahead and play around—you can’t really hurt anything.

Choose your software

This is the real meat and potatoes of creating a system. Click the “Software” tab and check out the packages already going into your system.

Based on your selection of a GNOME desktop, and SUSE Studio assuming you want the Linux basics needed to boot, a few packages and repositories are already installed for you. They’re based on a basic installation of OpenSUSE, but you could wipe the slate clean and start over with another RPM-based repository, if you so chose.

Full size

If you wanted to add Firefox to your system, simply search for it in the search bar farther down the page. Results from the repositories you've chosen appear, and you can click “Add+” to load them into your system, with dependencies and other needed packages automatically included. What if you don’t see something you know runs on Linux—like, say, Google Chrome? Find an RPM-formatted package, like those I found at Ben Kevan’s blog, or add in a repository URL that carries regular updates. Generally, a good Google search for the name of your program and “OpenSUSE” should yield fruit. Hit the “Upload and Manage RPMs” link near the top of the Software page, and you’ll be able to upload from your computer, or point to a file on the web. What’s really neat is, once you upload your RPM files, you’ll have a special repository created for you that can be loaded into any system you build with SUSE Studio.

Change the look and feel

Once you’re done tinkering with your apps, head over to the Configuration tab to mess with your eye candy and determine how your system will boot up. Start at the “General” sub-section, making sure to change the user name at bottom to something other than “Tux” and change the password away from the standard “linux.” You can set how you want your system to find a network connection (anything other than the manual or no-network options should be fine), and whether to enable a firewall.

The Personalize section only has two parameters, but who doesn't like to see their own logos and backgrounds stamped on a system? Next over, make sure the “Startup” section has you set to boot into a graphical login. Under “Desktop,” you can set the OS to automatically boot to a desktop for faster start-up times, and the “Configuration” field lets those planning to install to a disk or USB drive, or run in a virtual machine, fine-tune their memory and disk use settings. “Overlay files” and “Scripts” can mostly be skipped, unless you've got documents you need to have in your test system or already work at a high level of Linux knowledge.

Grab and boot your OS

Full size
The “Build” section is where you get the good stuff. Pick the format you’d like to download, whether an ISO for creating a CD/DVD, a disk image for hard disk or USB transfer, or a ready-made virtual machine file for VirtualBox or VMWare. Choose your format, set a version number, and that build will always be available for downloading or “cloning.” Not quite sure what to do with the files you received? Here’s SUSE Studio’s guide to using SUSE Studio appliances—though we’d certainly welcome more tips, especially on imaging USB drives with .RAW image files, in the comments.

Don’t have the time or patience to burn a CD or install a new virtual machine? SUSE Studio actually lets you run your custom-built appliances on their own vitalization servers, for up to one hour, for free. Hit the “testdrive” link on one of your builds, and wait for it to boot up.


Build Your Own operating System Online

 
Computer World With IT © 2015 - Designed by Templateism.com