Showing posts with label Your Security. Show all posts

Monday, 11 November 2013

In this post I am gonna discuss an easiest Data Recovery Methods.
Today I will show you a trick to recover your deleted files without using any 3rd party software. I am not talking about restoring files from recycle bin.
Sometimes we might have delete some important files accidentally and we need them back. 
This simple trick mostly works on Vista versions and all the Windows 7  and Windows 8 versions.

How to Recover Deleted Files without Any Software


So let's see How to Recover Deleted Files without Any Software 

For example lets assume that you have permanently deleted "My Sweet Heart.JPG" from the folder named "My LIFE" ;) , and now you want to recover "My Sweet Heart.JPG"back.
Do this simple trick to recover your Sweet Heart.JPG
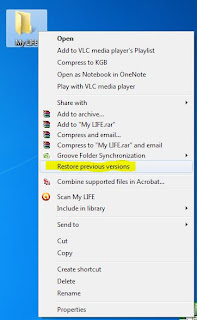
Right Click on the particular folder
Select "Restore previous versions"
Data Recovery Methods
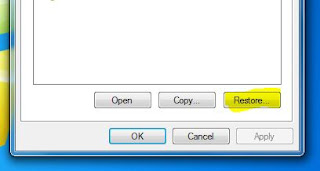
That's all, now you will see a option to recover the particular file.

Data Recovery Methods

If you don't see "Restore previous Versions" by Right Clicking, Go to
Control Panel ----->
System and Security---->
System---->
Click on System Protection (in left sidebar)
---->
Select the particular drive and Click Configure
---->
Then select "Restore system setting and previous versions of files"
---->
Now Click on OK

Note : 
Previous versions come from restore points or from windows backup.
This trick will not work at all the time.

How to Recover Deleted Files without Any Software

Saturday, 9 November 2013

Today I'm gonna talk about Password Protection to Pan Drive without using Software.

I will show you a simple trick to lock your USB drive without using any 3rd party software.
Most of the people doesn't like other people checking their personal files and folder on USB, including me. This insecure situation creates a huge space to theft our personal data by someone. If you use password protection to your USB, you can reduce the data theft.

Lots of USB password protect software available in present market, but you want to pay money to use it for lifetime. If you're using Windows you don't need any software.


Password Protection to USB Drive without using Software
So let's see how to set a password protect on your Pan Drive without using any software.

Insert your Pan drive to computer
Click on Start
In "Search programs and files" box, type Bit locker Drive Encryption
Now launch that application.
Password Protection to USB Drive without using Software

Then look for your Pan drive and click on Turn on Bitlocker
Password Protection to USB Drive without using Software

Windows will ask you to set a password. 
Now set a strong password.
Click on Next
Password Protection to USB Drive without using Software

If you want save the password in a safe place.
And click on Next
Password Protection to USB Drive without using Software

Now click on Star Encrypting
Password Protection to USB Drive without using Software

That's all !!! :)
From right now if someone tries to access your USB, Windows will ask him/her to enter the current password.

Note : This trick will works only in Windows

How to Password Protection to Pan Drive without using Software

Friday, 1 November 2013

Quick Heal Total Security 2014 Free Download with Creak File Lifetime
Download Quick Heal antivirus Pro 2014 to fight against unknown internet virus threats that might set up your Personal Computer danger zone. Earlier Free version of Quick Heal antivirus Pro 2012 trial includes safety measures of antivirus, anti-spyware, anti-malware, Anti-root-kit, firewall and other virus removing tools of IDS/IPS to give most excellent computer defense for your PC at assorted levels.

Quick Heal Antivirus Pro 2014 is principally designed to safe guard against viruses, Trojans, worms, spywares, root kits, malware, online hackers and all other newest threats that might arise when you are surfing Internet. To keep away those unsafe viruses it acts and has capability of an unbreakable real time shield to protect users PCs.

Quick Heal Total Security 2014 Free Download with Creak File Lifetime

The outstanding virus fighting security of quick heal pro antivirus make it unique in the field of guarding users computers from various online virus threats. The controlling and competent anti-spyware module prevents identity thefts, while the Firewall service speedily identifies harmful network activities and forbids them from affecting your system and it does full system scan to find out infected files. 

Another best feature in Quick Heal pro 2014 Antivirus Edition is that you can even verify the status and validity of your emails whether they are threatened by virus or not. If those files are infected, by scanning those mail attachments you could block the suspicious attachments. Quick Heal antivirus provides Cloud based Web protection. It blocks any suspicious internet virus that might harm your PC.

Features -

Quick Heal antivirus automatically scans external storage devices
Detects and removes potentially unwanted applications  (PUAs).
It assists a hand to create an emergency boo-table disk for Windows Personal Computer.
The Entertainment Mode allows the user to play games, watch movies or presentations uninterruptedly. Quick Heal Anti-virus Pro 2014 Free 30 days Trial Pack features simple and easy-to-use interface to get started then Creak  it Lifetime.
Quick Heal Total Security - Free One Month Trial
  • Platforms:Windows 2000/Windows XP/Windows Vista/Windows 7/
  • Windows 8/ Windows 8.1
  • System Type:32-bit or 64-bit of Desktop Operating System
  • Last Updated:16 October, 2013
  • Size:505 KB - 266 MB

Quick Heal Total Security 2014 Free Download with Creak File Lifetime

Avast Internet Security 2014 Free Download with Key 2015

As we all know that avast is one the top antivirus software having most comprehensive security Solutions for users Personal Computer threats. Now its Avast internet  security that features all advanced features to provide protection against all your internet threats. The avast internet security 2014 includes functions of Avast free antivirus, anti-spam filter, a silent Firewall protection, command line scanner and the new avast safe-zone which is a clean and isolated desktop icon that can effectively work even key-loggers cant see exactly what happening.


Avast Internet Security 2014 Free Download with Key 2015


Avast internet security 9 is especially designed to give protection over all online shopping or banking transactions not to hack by others.Avast internet security provides maximum protection when you are making any threat linked download file on your PC or surfing the web online, engaging  with your social community friends as well playing games online (sometimes these online tasks can bring malware included viruses into your hard disk to disturb your  computer).


Avast Internet Security 2014 Free Download with Key 2015

Avast internet security 2013 Features –

  1. Avast Leaner and meaner version 6.0 provides unique and stand alone PC protection even faster than its predecessor 
  2. Offers an comprehensive web reputation browser extension  
  3. Free Avast internet security 6  safe guards your computer with real time security functions against all known and unknown forms of malware.  
  4. Provides accurate threat updates to inform you when there is any conflict occurs  
  5. Avast Community-IQ technology ensure worry-free downloading, surfing, social networking, and gaming.


(Password : thesoftwarecorner01 )

Avast Internet Security 2014 Free Download with Key 2015

Sunday, 15 September 2013

SQL Injection

As i worked a lot on SQL  Injection , n concluded that it is a vast technique or methodology or whatever .Giving Rise to bore or hacticness. why i m going here to give a simple n brief overview of how to Intrude a Website With SQL INJECTION Attack.

Here is a sample basic HTML form with two inputs, login and password.


The easiest way for the login.asp to work is by building a database query that looks like this:


SELECT id
FROM login
WHERE username = '$username'
AND password = '$password’


If the variables $username and $password are requested directly from the user's input, this can easily be compromised. Suppose that we gave "Joe" as a username and that the following string was provided as a password: anything' OR 'x'='x

SELECT id
FROM login
WHERE username = 'Joe'
AND password = 'anything' OR 'x'='x'


As the inputs of the web application are not properly sanitized  the use of the single quotes has turned the WHERE SQL command into a two-component clause.

The 'x'='x' part guarantees to be true regardless of what the first part contains.

This will allow the attacker to bypass the Login form without actually knowing a valid username / password combination!

Now this was how to Make a simple web attack with SQL Injection....But for security Professionals.>> How To Protect it.

So here we go for that as well..


How To prevent SQL Injection attacks?


Firewalls and similar intrusion detection mechanisms provide little defense against full-scale web attacks. Since your website needs to be public, security mechanisms will allow public web traffic to communicate with your databases servers through web applications. Isn't this what they have been designed to do?

Patching your servers, databases, programming languages and operating systems is critical but will in no way the best way to prevent SQL Injection Attacks

SQL Injection : Just For Beginners

Wednesday, 4 September 2013

Now a days all the people use USB Flash drives like Pendrive, External Hard Disk and Many more. They all skipped DVD, CD and all optical Disc because it takes time to copy and it cannot be re-used. So USB Pendrives are now with all people. Also you can see all over colleges, they hang USB pendrive in their necks. They carry Music, Movies, Data in that. How USB flash drives improves as the mean while USB virus also increases along with that.
Nowadays Some viruses / malwares (may be Trojans, W32.IRCBot.NG)  is spread all over the world which is particularly attacks flash memories like pendrive, memory cards, sd cards and all other usb storage drives.
The main function of this malware is to hide all the files in the flash drive and to store malware, adware, bot, keyloggers in the same flash drive in a file name exactly what you've early in that drive.
For example: Assume that you are inserting a pendrive or your mobile phones memory sd card in a above virus attacked computer or laptop.  those viruses will copy some viruses to your pendrive immediately after inserting your pendrive in that computer, and that virus will start its duty instantly.  First it will hide all the files by setting those files attributes (properties) system files.  Now your system will hide all those files automatically since those are all marked as system files and system files are very necessary to run OS and some application smoothly. 
 Then the virus will store some shortcuts into your pendrive.  Actually those all are not shortcuts, they are all application (virus) instead.  Those shortcuts will be renamed exactly as your files whichever is hidden by this virus.
Below picture is an example how the virus infected pendrive's files will look.

This is to confuse you, sure you'll think these are all the shortcuts for your files stored in your pendrive and the main theme of this confusion is to force you to open those shortcuts (actually virus application).
If you tried to open those shortcuts, nothing will happen, neither your file opens nor any error notifications.  But in background, this virus will run an application which spreads this virus immediately to the computer / laptop you've inserted this pendrive.
You'll get tired and you'll realize that your memory drive is infected with a virus after giving several successful tries to open your files.  Now, you'll sadly decide to format your pendrive. 
But wait..... don't do it....
Your files are safe!!!!!!!!!!!!!
You can still see it!!
Using Manually Infected Hide File Show
Go to Tools>>Folder Options>>  then Check (tick) "Show Hidden Files"  and Unchecked (uptick) "Hide Protected Operating system files" >> Hit Apply >> OK to close the folder option window. (See below picture for guidence)
Be amazed you can now see all your hidden files whatever you thought you've lost.....!!!!!!!
Now you can safely copy your files and folders to your computer but note, the attributes of these files often stay unchanged even if you unchecked hidden attribute on file/folder properties. Those files and folder still marked as system files and again you cant' see these files and folders once you Tick the "Hide Protected Operating system files" .
If it is a Memory SD card of a mobile phone, then the mobile still can't able to show your files while you try to access your memory via your mobile.
don't worry still your files and folders are safe and you can retrieve it back to normal as cleaned one.  I have a solution for it.
Using Command prompt

How To Recover Deleted (Hidden) Files from Virus infected USB Pendrive

Today in the modern world USB devices are very common among computer users. Nowadays the USB device has become the greater special quality in saving the important files and all other documents. It’s very common in the world because of it’s a movable and large disk space produced.


Either we are using a personal computer or laptop in any places it can be even in office. Computers or laptops having a possible or open USB ports on our machines can setup a computer guard threat where any person using computers can plug in a enable virus infected flash disk, outside hard drive, or any other USB competent devices. And also within our computers unlimited USB ports also can be created by an uncontrolled flow of data belonging to a corporation data or other users are enabling to act out personal.

I. Disabling through Registry Editor:

1. Goto run
2. Type 'regedit' without quotes
3. Click on HKEY_LOCAL_MACHINE
4. goto SYSTEM
5. Click on CurrentControlSet
6. Click on services
7. Goto USBSTOR
8. Double click on 'Start' where value is 3
9. Now change the value data with 4
10. Now press ok and refresh your desktop your USB port is disabled, to enable the usb port replace the value 4 with 3.


II. Disabling through BIOS:

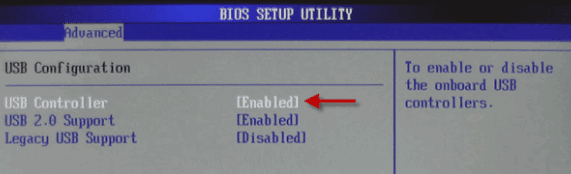
1. At system startup press DEL or F2 key to open BIOS settings.

2. In BIOS, find “Advanced Settings” or “Onboard Devices” menu (this may vary due to different BIOS manufacturers)
3. Find “USB Configuration” and "Disable" USB Controllers to disable all USB ports.
To re-enable USB ports change this to "Enable"

How to Disable USB Port

Saturday, 17 August 2013


Do have files that you consider confidential? or a files that you don't want to see by your wife or kids? then hide it behind the JPEG image. Here is a clever and simple trick to hide your files behind Jpeg images. 

Here is what you need:
  • WinRAR installer
  • Image or Picture files 
  • and the Files that you want to hide.
1.Dpwnload and install Winrar
2. Next create a Folder then put any IMAGE file and the FILES that you want to hide inside.
3. Compress the files that you want to hide by selecting the files then right click then select "Add to [Foldename]"


4. Now you will see that a new compress file is created
5. Now here is the trick: Enter toCMD and navigate to where you put your files (in my case I created a folder in the root of drive C: ),  if you are using Windows7 just hit SHIFT + Right Click the mouse anywhere inside the folder then select "open command window here". Then type in command prompt:

 copy  /b  logo.jpg  + hidden.rar  secret.jpg

Where: logo.jpg is an image | hidden.rar is compressed file to be hidden | secret.jpg is new image files with hidden file. 

6.  You will notice a secret.jpg file is created. Now you have a jpg image file with your files inside it. Now who will think that your files is hidden inside a jpg image. :)

To access the hidden files: just rename or change the extension file .jpg to .rar and you can view or extract your hidden files

Hide your Files Behind JPEG Image

Tuesday, 11 June 2013

Getting blocked by Facebook from sending Friend Requests is really annoying specially when you are really in need of sending a friend request to someone. This error commonly occurs when we are trying to send request to those people to whom you don’t know or you don’t have mutual friend to him/her then an error pops out and says ’This Request Can’t Be Sent’ which is very annoying thing. So today i will tell you a trick with help of which you can bypass the ‘This Request Can’t Be Sent’ error on Facebook to send friend requests.  
Bypassing The 'This Request Can't Be Sent' Error On Facebook To Send Friend Requests

Bypassing The ‘This Request Can’t Be Sent’ Error On Facebook To Send Friend Requests

What We Need For This Trick?
1. Firefox (FF) web browser.
2. Temper Data (FF extension).

How To Use This Trick?

1. First of all go to this LINK and install Temper data.
2. Go to Facebook account and send request to person to whom you want to add as friend.

3. When you click on add friend an error popup message is shown as below

Here’s the screen you’ll see when Facebook blocks you from trying to add a friend. The title of the dialog box says “This Request Can’t Be sent”, and “Do you know this user personally?”. 
So how can you send friend request? Here is the start of trick.
 
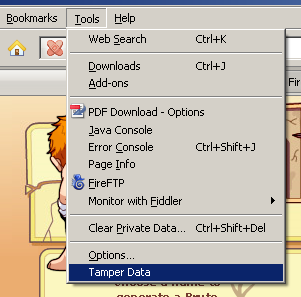
4. Go to Tools menu in your Firefox browser and you will find “Temper Data”.
Temper Data
5. Click on “Temper Data” option. you will see another window like this.

6. Click on start Temper. Now your Temper data is started.
7. Go to Facebook and send request again to person to whom you want to add as friend by clicking “Add Friend”.
8. Now when you click on “Add friend” a popup message is shown.
Temper With Request Confirmation Window
9. Note the URL from above popup message and hit “Temper”.
10. Now another window will be opened. Make sure that the URL that you get is similar to what you see in the pic above.


11. Now you have to do some modifications in above popup message. As you can see, the highlighted option ‘Submit’ has the value ‘1‘ by default, you have to change it to ‘0‘ and press ‘OK’.
12. Now an another popup (change content header) will be shown. Just press “OK”. As you press it your friend request will be sent.
You are done! Isn’t is easy to bypass the ‘This Request Can’t Be Sent’ error and send friend request. Stay Connected for more updates.

Bypassing The 'This Request Can't Be Sent' Error On Facebook To Send Friend Requests

 
Computer World With IT © 2015 - Designed by Templateism.com