Showing posts with label PC Trick. Show all posts

Tuesday, 31 December 2013


[How to] Disable an application from Startup


How to remove any annoying applications from start up. Your PC is starting up slowly?.. Are you bugged by waiting for a long time for your PC to load Or some annoying applications is getting loaded in startup like torrents ??.

Then, here is the solution to remove applications from startup.


1. First all Go to start and type "msconfig" and you will "msconfig.exe" Click that. Shown in the below screenshot.


[Step by Step] ]How to Disable an application from Startup

2. Then After clicking on msconfig.exe. A screen pops out. There you need to navigate yourself to startup tab. And in that startup tab unmark any application you want to remove from startup. And click on apply and then Click OK. Its explained in the screen shot given below.


[Step by Step] ]How to Disable an application from Startup

3. After Clicking OK in the above screen, another screen pops out Click on "Restart ".  As here we are dealing about Startup, It changes only after the restart the computer, So now you must restart the computer to see the changes. The screenshot is shown below here.

[Step by Step] ]How to Disable an application from Startup

So after restarting your computer all the unmarked applications wont be remaining on the startup and your PC starts up more fast than before and also annoying app's wont be there. And there are many ways to Disable the app's from startup. And Do the vice versa to enable the same app to add in the startup. This is one of the simplest way, So we have taken this simplest method in this tutorial to show how to remove an app from startup. 
Now Enjoy....

[Step by Step] ]How to Disable an application from Startup

Sunday, 24 November 2013

Hi friends,

Today I have One of the annoyances of Windows 8 is trying to find all the various system settings. Here is a way to make them readily available in one big list.


How to Access all the settings in Windows 8 at One Places

If you are new to the term ‘God Mode’ then you should know that there is a shortcut to access various settings in Windows Vista and later versions of Windows from Microsoft. God Mode which is also known as the ‘Windows Master Control Panel’ allows you to access all of the operating system’s control panels from within a single folder.


  •     Go to the Desktop
  •     Right-click an empty spot on the Desktop
  •     Choose “New-Folder”
  •     Give the folder this name:
  •     All Settings .{ED7BA470-8E54-465E-825C-99712043E01C}
  •     Open the folder to see a complete list of settings.
enjoy the easy way to access windows 8  settings at one go...

How to Access all the settings in Windows 8 at One Places

Monday, 11 November 2013

In this post I am gonna discuss an easiest Data Recovery Methods.
Today I will show you a trick to recover your deleted files without using any 3rd party software. I am not talking about restoring files from recycle bin.
Sometimes we might have delete some important files accidentally and we need them back. 
This simple trick mostly works on Vista versions and all the Windows 7  and Windows 8 versions.

How to Recover Deleted Files without Any Software


So let's see How to Recover Deleted Files without Any Software 

For example lets assume that you have permanently deleted "My Sweet Heart.JPG" from the folder named "My LIFE" ;) , and now you want to recover "My Sweet Heart.JPG"back.
Do this simple trick to recover your Sweet Heart.JPG
Right Click on the particular folder
Select "Restore previous versions"
Data Recovery Methods
That's all, now you will see a option to recover the particular file.

Data Recovery Methods

If you don't see "Restore previous Versions" by Right Clicking, Go to
Control Panel ----->
System and Security---->
System---->
Click on System Protection (in left sidebar)
---->
Select the particular drive and Click Configure
---->
Then select "Restore system setting and previous versions of files"
---->
Now Click on OK

Note : 
Previous versions come from restore points or from windows backup.
This trick will not work at all the time.

How to Recover Deleted Files without Any Software

Sunday, 10 November 2013


Today Computer World With IT tutorial is about how to hide your local drive without any 3rd party software's . There are lots of free and payable software's available to hide your local drive, but I am not gonna talk about hide a local drive using a software. In this tutorial I will show you an easiest way to hide local drive without using software. This will save your both money and time.

There are 3 methods available to hide a local drive without using any software

1. Hide a drive through gpedit
2. Hide a drive through regedit
3. Hide a drive using command prompt


Today we are covering 3rd Method command prompt way of doing it. So lets see how to do.

How to Hide any Local Drive using CMD

How to Hide a Local Drive using command prompt?


1. Click on Start - Run

2. In Run box type cmd and hit Enter. Now Command Prompt window will appear.

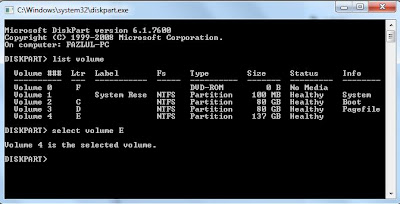
3. In command prompt, type diskpart and hit Enter.

4. Then type list volume and hit Enter.

Now it will display the list of all your computer drives details.

How to Hide any Local Drive using CMD

5. Then type the Drive Letter which you want to hide.
If you want to hide volume E, type select volume E and hit Enter.

Now follow mentioned massage will appear to you.
Volume 4 is the selected volume


How to Hide any Local Drive using CMD


6. After that, type remove letter E and hit an Enter. 

That's all, you have done. Now restart your computer once. When you start your PC again, you want be able to see the particular drive in My Computer.


How to get back Hidden Drive again in My Computer.


Do the procedure which i have mentioned in step 1,2,3,4 and 5 again.

Click Start----> Run 
----> cmd ----> 

Then type diskpart - list volume - select volume E 

After that type assign letter E and hit Enter.

That's all !! You have got back the hidden local drive. Once again restart your PC, now you will be able to see hidden local drive in My Computer.

Note: Your PC doesn't lost any data by doing this trick .

How to Hide any Local Drive using CMD

Saturday, 9 November 2013

Today I'm gonna talk about Password Protection to Pan Drive without using Software.

I will show you a simple trick to lock your USB drive without using any 3rd party software.
Most of the people doesn't like other people checking their personal files and folder on USB, including me. This insecure situation creates a huge space to theft our personal data by someone. If you use password protection to your USB, you can reduce the data theft.

Lots of USB password protect software available in present market, but you want to pay money to use it for lifetime. If you're using Windows you don't need any software.


Password Protection to USB Drive without using Software
So let's see how to set a password protect on your Pan Drive without using any software.

Insert your Pan drive to computer
Click on Start
In "Search programs and files" box, type Bit locker Drive Encryption
Now launch that application.
Password Protection to USB Drive without using Software

Then look for your Pan drive and click on Turn on Bitlocker
Password Protection to USB Drive without using Software

Windows will ask you to set a password. 
Now set a strong password.
Click on Next
Password Protection to USB Drive without using Software

If you want save the password in a safe place.
And click on Next
Password Protection to USB Drive without using Software

Now click on Star Encrypting
Password Protection to USB Drive without using Software

That's all !!! :)
From right now if someone tries to access your USB, Windows will ask him/her to enter the current password.

Note : This trick will works only in Windows

How to Password Protection to Pan Drive without using Software

Wednesday, 16 October 2013

Hello guys,
     
      Everyone of us have some private files on systems which we do not want others to access them. Some hide those files on computer and some others use software to password protect them. But using a software leads to many problems like, getting system hang, also when we format our system the software will be removed automatically which causes your protected files to be public.
So , it is good to password protect a file on computer using a simple notepad trick by using .BAT extension.


What you need to do:


1.  Create a random folder with random name somewhere on your computer (for example, on your Desktop).
2.  Open Notepad and paste this code to your Notepad
@ECHO OFF
title Folder Private
if EXIST "Control Panel.{21EC2020-3AEA-1069-A2DD-08002B30309D}" goto UNLOCK
if NOT EXIST Private goto MDLOCKER
:CONFIRM
echo Are you sure you want to lock the folder(Y/N)
set/p "cho=>"
if %cho%==Y goto LOCK
if %cho%==y goto LOCK
if %cho%==n goto END
if %cho%==N goto END
echo Invalid choice.
goto CONFIRM
:LOCK
ren Private "Control Panel.{21EC2020-3AEA-1069-A2DD-08002B30309D}"
attrib +h +s "Control Panel.{21EC2020-3AEA-1069-A2DD-08002B30309D}"
echo Folder locked
goto End
:UNLOCK
echo Enter password to unlock folder
set/p "pass=>"
if NOT %pass%== ComputerWorldwithIT goto FAIL
attrib -h -s "Control Panel.{21EC2020-3AEA-1069-A2DD-08002B30309D}"
ren "Control Panel.{21EC2020-3AEA-1069-A2DD-08002B30309D}" Private
echo Folder Unlocked successfully
goto End
:FAIL
echo Invalid password
goto end
:MDLOCKER
md Private
echo Private created successfully
goto End
:End

3.  Change the word ComputerWorldwithIT (the word I marked in blue from the code), to your desired password. (For example: your name )

4.  Save As or Press (Ctrl + S) and name it "private.bat" (without the quotation marks), then click on the "Save as Type" option and choose "All Files (*.*)". Save it on the random folder that you created earlier.

5.  Close the notepad and open the folder that you created earlier, there should be some program named "Private.bat" that you created earlier, click on it and it should create a new folder named "Private" by itself. Do not change the folder name, as it may caused error.

6.  Now you have a random folder with a folder inside of it named "Private", put some private things maybe a pictures, videos, or anything in to the "Private" folder.

7.  When you're done, click twice on the "private.bat", and it should give you the option to lock the folder. Press "y" to lock the folder, don't be surprise once you agree to locked the folder, the "Private" folder will disappear along with anything you put inside of it.

8.  To spawn the folder, you need to click on the "private.bat" and enter your password, then the folder will spawn by itself. To lock and make the folder disappear again, all you need to do is click on the "private.bat" and an option appear that told you if you want to lock the folder again, you must press "y".

Note: for this trick to work 100% make sure that you computer in "don't show hidden files,folders,or drives" mode as below image


hope u like this post :)

How To Mack A Password Protected Folder Using Notepad

Saturday, 12 October 2013

How many of you using Genuine windows 7 ?
we all know that everyone can't buy a genuine windows 7, because cost is too high.
Lots of Windows 7 users have experienced the error message that "Windows 7 is not genuine". 
This error message comes if you use pirated or OEM versions of Windows 7.
If windows 7 is not genuine, even you can't change the background wallpaper or any other display related option on your PC.
make Windows 7 Genuine using Command Prompt
So now i'm going to show you a easy way to make your windows 7 genuine using command prompt.

How to make Windows 7 genuine using Command Prompt

Press Windows key + R
Now "run" box will appear , in "run" box type CMD 
Click on OK

Note : Run CMD as Administrator 


Now command prompt will appear

In command prompt type SLMGR -REARM
Hit Enter.


Wait 5-10 seconds

Now a message will appear as shown in image below.

make Windows 7 Genuine using Command Prompt

Done !!!
Now your
 Windows 7 is genuine .. :D
Restart your PC once. Hereafter you won't see the warning message that "Windows 7 is not genuine" 

How to make Windows 7 genuine using Command Prompt

Monday, 7 October 2013

Hello guys,
follow the steps given below to disable CMD (command prompt)


1. Win R (RUN), type gpedit.msc and Ok.


How to disable CMD in any system

2. In Group Policy browse to "USER CONFIGURATION / ADMINISTRATIVE TEMPLATES" and highlight the 

Systems Folder

3. Double click, "Prevent access to the command prompt."

4. Change settings to 'Enable' and click 'ok'


just reverse the process to gain access of CMD again


try this on your friends computer and have fun ;)

How to Disable CMD in any Computer

Sunday, 15 September 2013

creating undeleteable files

In this tutorial you will learn cool and simple trick to Create an Undeletable and unrenameable Folders In Windows operating system. Most of the Peoples are not aware that it is possible to create Undeletable, Unrenamable folder in windows without any software. To Test this concept just follow simple steps given below.

Try to make a new folder in windows & give it name con,aux, lpt1, lpt2, lpt3 up to lpt9. you won't be allowed to create folder with above mentioned names, Because they are reserved words in windows.

How To Create Undeletable And Unrenamable Folders ?

  1. Go to Start and then Click on Run
  2. Type cmd & hit enter (To open Command Prompt ).
  3. Remember you cannot create Undeletable & unrenamable folder in your root directory (i.e. where the windows is installed) That means you can't make this kind of folder in C: drive if you installed windows on C:
  4. Type D: or E: and hit enter
  5. Type md con\ and hit enter (md - make directory)
  6. You may use other words such as aux, lpt1, lpt2, lpt3 up to lpt9 instead of con in above step.
  7. Open that directory, you will see the folder created of name con.
  8. Try to delete that folder or rename that folder windows will show the error message.

How to delete that folder ?


It is not possible to delete that folder manually but you can delete this folder by another way mentioned below.
  1. Open Command Prompt
  2. Type D: ( if u created this type of folder in D: drive) & hit enter
  3. Type rd con\ (rd - remove directory)
  4. Open that directory and the folder will not appear because it is removed.

How to Create A Undeletable And Unrenamable Folders In Windows

Wednesday, 4 September 2013

Now a days all the people use USB Flash drives like Pendrive, External Hard Disk and Many more. They all skipped DVD, CD and all optical Disc because it takes time to copy and it cannot be re-used. So USB Pendrives are now with all people. Also you can see all over colleges, they hang USB pendrive in their necks. They carry Music, Movies, Data in that. How USB flash drives improves as the mean while USB virus also increases along with that.
Nowadays Some viruses / malwares (may be Trojans, W32.IRCBot.NG)  is spread all over the world which is particularly attacks flash memories like pendrive, memory cards, sd cards and all other usb storage drives.
The main function of this malware is to hide all the files in the flash drive and to store malware, adware, bot, keyloggers in the same flash drive in a file name exactly what you've early in that drive.
For example: Assume that you are inserting a pendrive or your mobile phones memory sd card in a above virus attacked computer or laptop.  those viruses will copy some viruses to your pendrive immediately after inserting your pendrive in that computer, and that virus will start its duty instantly.  First it will hide all the files by setting those files attributes (properties) system files.  Now your system will hide all those files automatically since those are all marked as system files and system files are very necessary to run OS and some application smoothly. 
 Then the virus will store some shortcuts into your pendrive.  Actually those all are not shortcuts, they are all application (virus) instead.  Those shortcuts will be renamed exactly as your files whichever is hidden by this virus.
Below picture is an example how the virus infected pendrive's files will look.

This is to confuse you, sure you'll think these are all the shortcuts for your files stored in your pendrive and the main theme of this confusion is to force you to open those shortcuts (actually virus application).
If you tried to open those shortcuts, nothing will happen, neither your file opens nor any error notifications.  But in background, this virus will run an application which spreads this virus immediately to the computer / laptop you've inserted this pendrive.
You'll get tired and you'll realize that your memory drive is infected with a virus after giving several successful tries to open your files.  Now, you'll sadly decide to format your pendrive. 
But wait..... don't do it....
Your files are safe!!!!!!!!!!!!!
You can still see it!!
Using Manually Infected Hide File Show
Go to Tools>>Folder Options>>  then Check (tick) "Show Hidden Files"  and Unchecked (uptick) "Hide Protected Operating system files" >> Hit Apply >> OK to close the folder option window. (See below picture for guidence)
Be amazed you can now see all your hidden files whatever you thought you've lost.....!!!!!!!
Now you can safely copy your files and folders to your computer but note, the attributes of these files often stay unchanged even if you unchecked hidden attribute on file/folder properties. Those files and folder still marked as system files and again you cant' see these files and folders once you Tick the "Hide Protected Operating system files" .
If it is a Memory SD card of a mobile phone, then the mobile still can't able to show your files while you try to access your memory via your mobile.
don't worry still your files and folders are safe and you can retrieve it back to normal as cleaned one.  I have a solution for it.
Using Command prompt

How To Recover Deleted (Hidden) Files from Virus infected USB Pendrive

Today in the modern world USB devices are very common among computer users. Nowadays the USB device has become the greater special quality in saving the important files and all other documents. It’s very common in the world because of it’s a movable and large disk space produced.


Either we are using a personal computer or laptop in any places it can be even in office. Computers or laptops having a possible or open USB ports on our machines can setup a computer guard threat where any person using computers can plug in a enable virus infected flash disk, outside hard drive, or any other USB competent devices. And also within our computers unlimited USB ports also can be created by an uncontrolled flow of data belonging to a corporation data or other users are enabling to act out personal.

I. Disabling through Registry Editor:

1. Goto run
2. Type 'regedit' without quotes
3. Click on HKEY_LOCAL_MACHINE
4. goto SYSTEM
5. Click on CurrentControlSet
6. Click on services
7. Goto USBSTOR
8. Double click on 'Start' where value is 3
9. Now change the value data with 4
10. Now press ok and refresh your desktop your USB port is disabled, to enable the usb port replace the value 4 with 3.


II. Disabling through BIOS:

1. At system startup press DEL or F2 key to open BIOS settings.

2. In BIOS, find “Advanced Settings” or “Onboard Devices” menu (this may vary due to different BIOS manufacturers)
3. Find “USB Configuration” and "Disable" USB Controllers to disable all USB ports.
To re-enable USB ports change this to "Enable"

How to Disable USB Port

Friday, 9 August 2013

You can access another computer using google chrome with out Rats system. 
it work on every computer if you have google chrome and you can download it by chrome app store.


HOW TO WORK WITH THIS APPLICATION

 
1. After installation goto the start page you can see the the application as shown below in your start page.

2. Click on the Chrome Remote app to open it and to see the window shown below.

3. Click continue and you will asked to allow access to your data. proceed with allowing access.


4. Then it will ask you whether you want to share your own computer to some other system or connect to a shared computer.

5. If you clicked share this computer, then it will generate automatic sharing code.


6. Just send this code to your partner to connect to your system as shown below.


7. Once connected you will see their desktop as seen below and can do whatever you like.

Thats all you have to do,
if you have suggestion or comment question write BELOW

thanx for reading!!

Remotely Access Any Computer via Chrome Browser

 
Computer World With IT © 2015 - Designed by Templateism.com